The timeless pairing of rich chocolate and creamy peanut butter holds a special place in the hearts of dessert lovers worldwide. From childhood memories to sophisticated cravings, it's a combination that simply can't be beaten. But what if you could recreate this beloved classic right in your own kitchen, with minimal effort and maximum flavor? Enter the world of homemade peanut butter cups – specifically, the quick, no-bake variety that promises pure indulgence without the fuss.
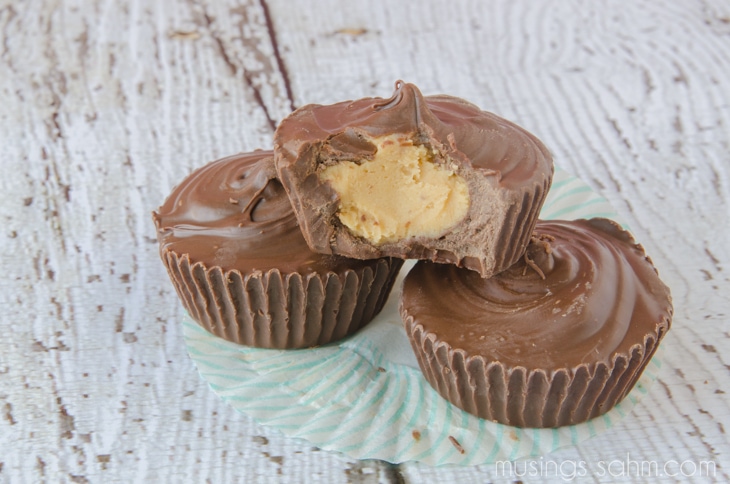
Imagine biting into a perfectly crafted peanut butter cup: a crisp chocolate shell yielding to a smooth, sweet, and slightly salty peanut butter filling. Now imagine that experience, knowing every ingredient is one you chose, free from preservatives and artificial fillers. These delightful treats are not just for special occasions; they're easy enough for a spontaneous Tuesday night treat and impressive enough to grace any holiday table. With just a handful of ingredients and about 15-20 minutes of active prep time, you'll discover a dessert so simple, yet so satisfying, it might just become your new signature sweet.
The Irresistible Charm of Homemade Peanut Butter Cups
For many, the allure of the peanut butter cup is undeniable. It's a confectionery masterpiece, a symphony of textures and flavors that has captivated palates for generations. While store-bought versions certainly have their place, there's an unparalleled magic that comes with crafting these treats yourself. When you choose to make homemade peanut butter cups, you're not just making a dessert; you're making a statement about quality, control, and the joy of creation.
One of the primary advantages of going homemade is the ability to dictate your ingredients. Say goodbye to unpronounceable additives, high-fructose corn syrup, and unnecessary fillers. Instead, you'll use real butter, quality chocolate, and your favorite peanut butter, resulting in a cleaner, fresher taste that truly shines. This control allows for a depth of flavor and a superior texture that often surpasses even the most popular commercial brands. Many enthusiasts find that their own creations are "even better than the store-bought version," offering a richness that's perfectly balanced and never overly sweet.
Beyond the ingredients, there's an inherent satisfaction in presenting guests (or simply enjoying yourself) a confection you've made from scratch. It feels incredibly cool, a testament to your culinary prowess, even if the recipe itself is surprisingly straightforward. This journey towards less-processed food doesn't mean sacrificing flavor; in fact, it often enhances it, offering a more authentic and robust taste experience. For those looking for even cleaner options, exploring variations like Healthier Peanut Butter Cups: No Preservatives, No Fillers can be a rewarding next step.
Why Go No-Bake? Simplicity Meets Sweet Satisfaction
In our increasingly busy lives, the thought of elaborate baking projects can be daunting. This is precisely where the beauty of the no-bake peanut butter cup recipe truly shines. It’s designed for simplicity and speed, making delicious desserts accessible to everyone, regardless of their baking experience or the amount of time they have.
The "no-bake" aspect means you skip the oven entirely, eliminating preheating times, cooling racks, and the potential for baking mishaps. The active preparation time for these quick treats typically hovers around 15 to 20 minutes. After a brief flurry of mixing and layering, the refrigerator takes over, allowing the chocolate to set and the flavors to meld beautifully. This hands-off setting time means you can tackle other tasks, entertain guests, or simply relax while your dessert practically finishes itself.
This stress-free approach is particularly valuable during hectic periods, such as holiday seasons, when chocolate should be a source of comfort, not an added chore. Hosting friends and family becomes even more delightful when you can offer a stunning, homemade dessert that didn't demand hours of your precious time. It’s also an excellent recipe for involving children in the kitchen, teaching them basic culinary skills without the dangers of a hot oven. The ease and speed ensure that these easy no-bake homemade peanut butter cups are always a viable option, whether for an impromptu craving or a planned celebration.
Mastering Your Melt: Tips for the Perfect Peanut Butter Filling
Crafting the perfect homemade peanut butter cups hinges on a few key ingredients and techniques. While the recipe is forgiving, understanding these nuances will elevate your treats from good to absolutely divine. Let's dive into the core components and some insider tips.
Choosing Your Ingredients Wisely
- Peanut Butter: The star of the show! Creamy peanut butter is typically preferred for the smoothest filling, but if you love a bit of crunch, feel free to use crunchy peanut butter. For a less processed option, natural peanut butter (the kind where oil separates) works wonderfully, but be sure to stir it very well to incorporate the oil before measuring.
- Chocolate: The quality of your chocolate makes a significant difference. Opt for good quality chocolate chips, melting wafers, or a chopped bar. Semi-sweet chocolate is a popular choice, offering a nice balance, but milk chocolate will deliver a sweeter, creamier profile, while dark chocolate adds a sophisticated bitterness.
- Butter: The unsung hero. The reference contexts highlight the importance of unsalted butter, and for good reason. Unsalted butter provides a clean, consistent baseline for your dessert. Salted butter can vary widely in its salt content by brand, leading to unpredictable results and potentially an overly briny taste in your final product. Starting with unsalted butter allows you to add a precise amount of salt yourself, giving you full control over the flavor balance and ensuring consistent, delicious results every time. It's a small choice with a big impact on predictable perfection.
- Powdered Sugar: This is essential for achieving that silky-smooth, melt-in-your-mouth texture for the filling. Granulated sugar won't dissolve properly and will leave a gritty mouthfeel.
- Salt: A pinch of salt is crucial. It doesn't just make things salty; it enhances and balances the sweetness of the chocolate and peanut butter, preventing the cups from tasting cloyingly sweet.
Technique Tips for Success
- Melting Chocolate: Gentleness is key. Use a double boiler method (a heatproof bowl set over a pot of simmering water) or microwave in short bursts (30 seconds at a time, stirring well after each) to prevent scorching. Overheated chocolate becomes thick and difficult to work with.
- Achieving the Right Filling Consistency: Your peanut butter filling should be firm enough to handle but soft enough to press into the chocolate layer. If it's too sticky, add a little more powdered sugar. If it's too dry, a tiny bit of melted butter can help.
- Layering: Use mini cupcake liners for easy handling and removal. Start with a thin layer of melted chocolate at the bottom, let it set briefly, then add a dollop of peanut butter filling, gently flatten, and top with more melted chocolate. A quick chill between layers helps maintain distinct strata.
- Temperature Control: Ensure your peanut butter filling isn't too warm when adding it to the chocolate, as it can cause the chocolate to melt prematurely. Similarly, the final chocolate layer will set best if the peanut butter filling is cool.
By paying attention to these details, you'll be well on your way to creating Easy Homemade Peanut Butter Cups: Better Than Store-Bought that are consistently perfect in taste and texture.
Beyond the Basic: Creative Variations and Serving Ideas
Once you've mastered the classic homemade peanut butter cups, the world of variations opens up! This simple base recipe is incredibly versatile, allowing you to customize and innovate to suit any taste or occasion.
- Nut Butter Alternatives: While peanut butter is traditional, don't shy away from experimenting with other nut butters. Almond butter cups offer a slightly different, sophisticated nutty flavor. Cashew butter or even a mixed nut butter could provide unique taste profiles. For dietary considerations, sunflower seed butter is an excellent nut-free option.
- Flavor Infusions: Elevate your peanut butter filling by adding a dash of vanilla extract, a pinch of cinnamon, or even a tiny amount of espresso powder to deepen the chocolate notes. A sprinkle of flaky sea salt on top of the finished cups not only looks beautiful but also provides a delightful contrast to the sweetness.
- Mix-ins and Toppings: Stir mini chocolate chips, finely chopped pretzels, crushed graham crackers, or even a sprinkle of chopped candied bacon into your peanut butter filling for added texture and flavor. Before the top chocolate layer sets, sprinkle with colorful sprinkles, more sea salt, or a contrasting chocolate drizzle.
- Chocolate Choices: Experiment with different types of chocolate for your shell. White chocolate peanut butter cups are a sweet variation, while a mix of dark and milk chocolate offers a complex flavor.
- Serving and Gifting: Homemade peanut butter cups make fantastic edible gifts. Arrange them in small decorative boxes or bags for a thoughtful present. For parties, arrange them on a dessert platter alongside other small bites. Their individual portion size makes them perfect for grab-and-go treats at any gathering.
Storing Your Sweet Success: Keeping Homemade Peanut Butter Cups Fresh
One of the best things about making homemade peanut butter cups is that they can be prepared ahead of time, making them ideal for entertaining or simply having a delicious stash on hand. Proper storage is key to maintaining their freshness, texture, and flavor.
Always store your peanut butter cups in an airtight container. This is crucial for two main reasons: it prevents them from absorbing any unwanted odors from other foods in your refrigerator, and it protects them from developing condensation, which can make the chocolate layer sticky or the filling soggy.
- Refrigerator Storage: In the refrigerator, your homemade peanut butter cups will stay fresh and delicious for up to 2 weeks. The cool temperature keeps the chocolate firm and the peanut butter filling perfectly set, offering a delightful snap and creamy texture with every bite.
- Freezer Storage: For longer-term enjoyment, these cups freeze exceptionally well. Place them in an airtight, freezer-safe container, and they will keep for up to 3 months. This is perfect for making a large batch and enjoying them gradually. When you're ready for a treat, simply remove them from the freezer and let them sit at room temperature for a few minutes. This allows the filling to soften just slightly, bringing it back to that ideal, creamy consistency.
Whether you're making a small batch for yourself or preparing dozens for a special event, knowing how to store your creations ensures that every single homemade peanut butter cup tastes as good as the first.
From the sheer delight of the first bite to the satisfaction of knowing you created something wonderful, homemade peanut butter cups are a culinary triumph within easy reach. This no-bake recipe not only offers a healthier, less-processed alternative to store-bought varieties but also provides a simple, stress-free way to enjoy a classic dessert. Their versatility means they're suitable for any occasion, from quiet nights in to festive holiday gatherings, and their make-ahead convenience is an added bonus. So, gather your ingredients, embrace the joy of creation, and prepare to indulge in these irresistibly quick, no-bake treats that are perfect for any moment.
