Healthier Peanut Butter Cups: A Wholesome Indulgence Without Preservatives or Fillers
There's a universally acknowledged truth in the world of sweets: the combination of chocolate and peanut butter is pure magic. For many, a classic peanut butter cup isn't just a treat; it's a foundational candy memory, a comforting indulgence that stands the test of time. While the mystery of who first united these two perfect partners might be lost to history, their irresistible allure certainly isn't. But what if you could enjoy that beloved flavor profile with the added peace of mind that comes from knowing every single ingredient? Welcome to the wonderful world of **homemade peanut butter cups** – a cleaner, more wholesome, and arguably even more delicious version of your favorite classic.
In an era where we're increasingly mindful of what we consume, the appeal of a treat free from unpronounceable additives, unnecessary fillers, and artificial preservatives is stronger than ever. This isn't just about sacrificing taste for health; it's about elevating both. By crafting these delights in your own kitchen, you gain complete control, transforming a simple dessert into a bona fide classic that's both deeply satisfying and surprisingly straightforward to create. Forget complicated confections; this recipe simplifies the process, delivering maximum flavor with minimal fuss, proving that chocolate is meant to ease stress, not add to it.
The Allure of Homemade: Why Ditch the Candy Aisle?
The commercial candy aisle offers convenience, but often at a cost to ingredient quality. Many store-bought peanut butter cups, while undeniably tasty, often contain a list of ingredients that includes hydrogenated oils, artificial flavors, and various preservatives designed to extend shelf life rather than enhance nutrition or flavor. When you make **homemade peanut butter cups**, you make a conscious choice to bypass these additives.
Imagine a treat where every component is something you recognize and can pronounce:
- Real Peanut Butter: Opt for natural peanut butter with just peanuts and salt (or unsalted for even more control).
- Quality Chocolate: Choose your favorite dark, milk, or semi-sweet chocolate, knowing exactly what's in it.
- Pure Sweeteners: Typically powdered sugar, allowing you to adjust sweetness to your preference.
- Unsalted Butter: A critical element for flavor consistency, as we'll explore.
This transparency isn't just a trend; it's a return to traditional baking values, where the purity of ingredients shines through. The satisfaction of offering guests, or simply indulging yourself, in a chocolate confection you've lovingly prepared with your own hands is truly immense. It feels impossibly cool, a tangible expression of care and culinary creativity that far surpasses any pre-packaged offering.
Crafting Perfection: Simple Ingredients, Superior Taste
The beauty of these healthier peanut butter cups lies in their simplicity. With just a handful of core ingredients, you can achieve a rich, creamy, and undeniably delicious result that often outshines its store-bought counterparts. The process is quick, often requiring only about 15-20 minutes of active work, making it perfect for even the busiest schedules or a fun activity to do with kids.
Let's delve into some key ingredient considerations for achieving that perfect balance:
The Case for Unsalted Butter
This might seem like a small detail, but it's a game-changer for consistency and flavor control in any dessert, especially these cups. Unsalted butter provides a clean, neutral baseline. Why is this so important?
- Predictable Results: Salted butter brands vary widely in their salt content. What might taste perfect in one batch could turn oddly briny in the next, leading to inconsistent flavors.
- Flavor Control: By starting with unsalted butter, you are in complete command. You can add a tiny pinch of fine sea salt yourself, if desired, to perfectly balance the sweetness of the chocolate and peanut butter. This precision is what elevates a good dessert to a great one.
- Recipe Compatibility: Most professional baking recipes and cookbooks assume the use of unsalted butter, with any additional salt listed separately. This separation ensures accuracy and reduces stress, allowing you to follow recipes with confidence.
Ultimately, it boils down to precision. Just as a baker might use a kitchen scale for exact measurements, using unsalted butter gives you full knowledge and control over the flavor profile of your **homemade peanut butter cups**.
Choosing Your Chocolate and Peanut Butter
The quality of your main stars dramatically impacts the final product.
- Chocolate: While any chocolate chips will work, investing in a good quality baking chocolate bar (chopped) will provide a smoother melt and richer flavor. Experiment with dark chocolate for a less sweet, more intense profile, or stick with classic milk chocolate for a sweeter treat. For best results, use a double boiler or microwave on low power, stirring frequently, to melt your chocolate smoothly, avoiding scorching.
- Peanut Butter: Opt for a natural, creamy peanut butter that lists only peanuts (and perhaps salt) in its ingredients. Avoid varieties with added sugars, hydrogenated oils, or excessive stabilizers, as these can alter the texture and flavor of your filling. If your natural peanut butter has separated, stir it well before incorporating.
Beyond the Basics: Tips for Your Best Homemade Peanut Butter Cups
Once you've mastered the basic recipe for **homemade peanut butter cups**, the possibilities for customization and perfection are endless.
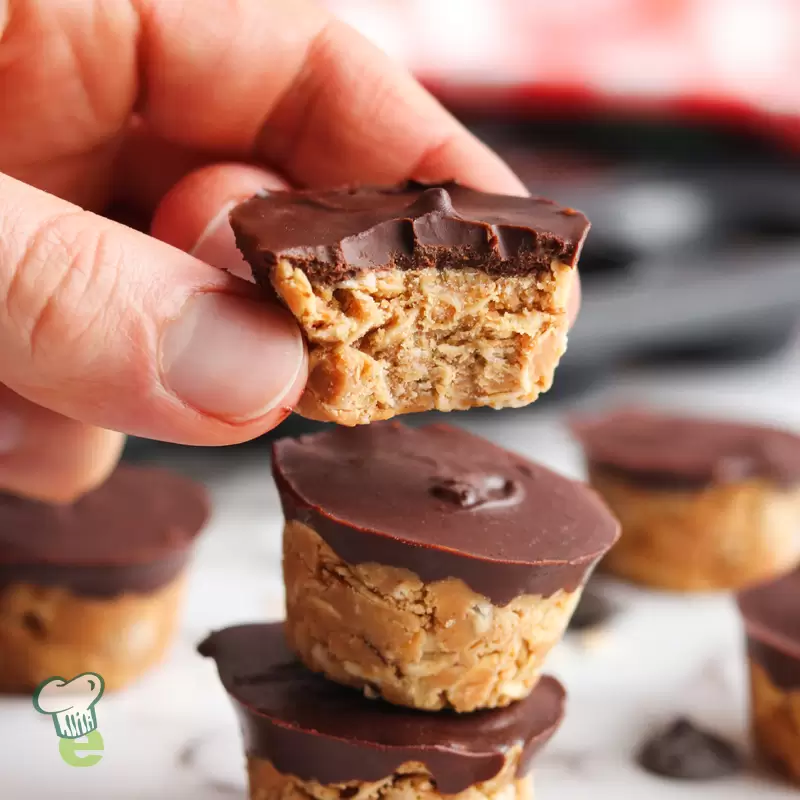
No-Bake Brilliance and Perfect Layers
One of the most appealing aspects of this recipe is its no-bake nature. It truly comes together in about 20 minutes of active time, making it an ideal last-minute treat or a fun kitchen project for all ages.
For those perfectly formed cups, lining a mini cupcake tin with paper or silicone liners is key. When layering, ensure your first chocolate layer is sufficiently set (a few minutes in the fridge or freezer helps) before adding the peanut butter filling, and again before topping with the final chocolate layer. This prevents mixing and ensures distinct, beautiful layers. For an extra professional touch, gently tap the muffin tin on the counter after each chocolate layer to release any air bubbles and ensure a smooth top.
Customization is Key
While the classic chocolate and peanut butter combination is divine, don't hesitate to experiment!
- Sea Salt Sprinkle: A tiny sprinkle of flaky sea salt on top of the finished chocolate layer enhances the flavors beautifully, adding a sophisticated touch.
- Nut Butter Variations: Not a peanut fan? Swap it for almond butter, cashew butter, or even sunflower seed butter for a nut-free option. Remember to check the consistency and adjust other ingredients slightly if needed. For more unique options, you might enjoy exploring recipes like Easy Homemade Peanut Butter Cups: Better Than Store-Bought which often include these variations.
- Mix-Ins: Fold in some mini chocolate chips, finely crushed pretzels for a salty crunch, or a pinch of cinnamon into your peanut butter filling.
- Flavor Extracts: A dash of vanilla extract in the peanut butter filling can deepen its flavor profile.
These small tweaks can transform your batch of **homemade peanut butter cups** into a unique signature treat. For even quicker solutions, consider recipes like
Quick No-Bake Peanut Butter Cups: Perfect for Any Occasion, which are designed for maximum speed and adaptability.
Hosting with Homemade Heart
There's an undeniable joy in offering homemade treats to friends and family, especially during holiday gatherings or when welcoming out-of-town guests. The act of creating something delicious from scratch, with your own hands, adds a layer of warmth and hospitality that store-bought items simply can't replicate. These healthier peanut butter cups are impressive enough for a special occasion, yet simple enough to whip up for a quiet Tuesday night indulgence.
Storage Savvy: Keeping Your Treats Fresh
Once your glorious **homemade peanut butter cups** are set, proper storage ensures they remain fresh and delicious for as long as possible.
- Refrigerator Storage: Store your cups in an airtight container in the refrigerator for up to two weeks. An airtight container is crucial to prevent them from absorbing any odors from other foods in your fridge or developing unwanted condensation.
- Freezer Storage: For longer enjoyment, these cups freeze beautifully. Place them in an airtight, freezer-safe container for up to three months. When you're ready to enjoy, simply let them sit at room temperature for a few minutes to allow the peanut butter filling to soften slightly, restoring that perfect creamy texture.
Indulge Wisely, Indulge Wholesomely
Making your own healthier peanut butter cups isn't just about avoiding preservatives and fillers; it's about reclaiming control over your treats, enjoying superior flavor, and savoring the simple pleasure of creation. These rich, creamy, and surprisingly easy-to-make delights truly outshine their commercial counterparts, offering a wholesome indulgence that you can feel good about. So, next time that chocolate and peanut butter craving hits, skip the candy aisle and create your own batch of irresistible **homemade peanut butter cups** – your taste buds and your well-being will thank you.